The idea behind the agent in LangChain is to use an LLM and a sequence of actions; the agent then uses a reasoning engine to decide which action to take. LangChain was useful for simple agents with straightforward chains and retrieval flows, but building more complex agentic systems was overly complicated-memory management, persistence, and human-in-the-loop components were implemented manually, rendering chains and agents less flexible.
This is where LangGraph comes into play. LangGraph is an orchestration framework built by LangChain. LangGraph allows you to develop agentic LLM applications using a graph structure, which can be used with or without LangChain.
This article focuses on building agents with LangGraph rather than LangChain. It provides a tutorial for building LangGraph agents, beginning with a discussion of LangGraph and its components. These concepts are reinforced by building a LangGraph agent from scratch and managing conversation memory with LangGraph agents. Finally, we use Zep's long-term memory for egents to create an agent that remembers previous conversations and user facts.
Summary of key LangGraph tutorial concepts
The following are the main concepts covered in this article.
| Concept | Description |
|---|---|
What is LangGraph? | LangGraph is an AI agent framework that implements agent interactions as stateful graphs. Nodes represent functions or computational steps that are connected via edges. LangGraph maintains an agent state shared among all the nodes and edges. Unlike LangChain, LangGraph supports the implementation of more complex agentic workflows. Key features include built-in persistence, support for human intervention, and the ability to handle complex workflows with cycles and branches. |
Building a LangGraph agent | Creating a LangGraph agent is the best way to understand the core concepts of nodes, edges, and state. The LangGraph Python libraries are modular and provide the functionality to build a stateful graph by incrementally adding nodes and edges. Incorporating tools enables an agent to perform specific tasks and access external information. For example, the ArXivtool wrapper can return content from research papers. LangGraph offers a prebuilt reason and act (ReACT) agent that can help you get started. |
Memory management in LangGraph | A LangGraph agent is stateless by default, meaning that it does not remember previous conversations, which limits its ability to have meaningful exchanges. To address this, LangGraph supports both short-term and long-term memory. Memory support in LangGraph can be extended further with Zep Memory. |
Zep long-term memory | Zep is a memory layer designed for AI agents that addresses several limitations of the default LangGraph short-term and long-term memory. Zep automatically extracts facts for user conservation and stores them as long-term memory objects. |
Guidelines for building LangGraph agents | LangGraph overcomes LangChain's limitations and is the recommended framework for building agentic architectures. You can integrate tools into your AI agents to provide functionality or fetch information that an LLM agent does not provide. Memory is integral to building production-ready AI agents, and third-party SDKs like Zep simplify adding long-term capabilities. |
What is LangGraph?
LangGraph is an AI agent framework built on LangChain that allows developers to create more sophisticated and flexible agent workflows. Unlike traditional LangChain chains and agents, LangGraph implements agent interactions as cyclic graphs with multiple-step processing involving branching and loops. This eliminates the need to implement custom logic to control the flow of information between multiple agents in the workflow.
How LangGraph works
As the name suggests, LangGraph is a graph workflow consisting of nodes and edges. The nodes implement functionality within the workflow while the edges control its direction.
The following diagram best explains how LangGraph works at a high level.
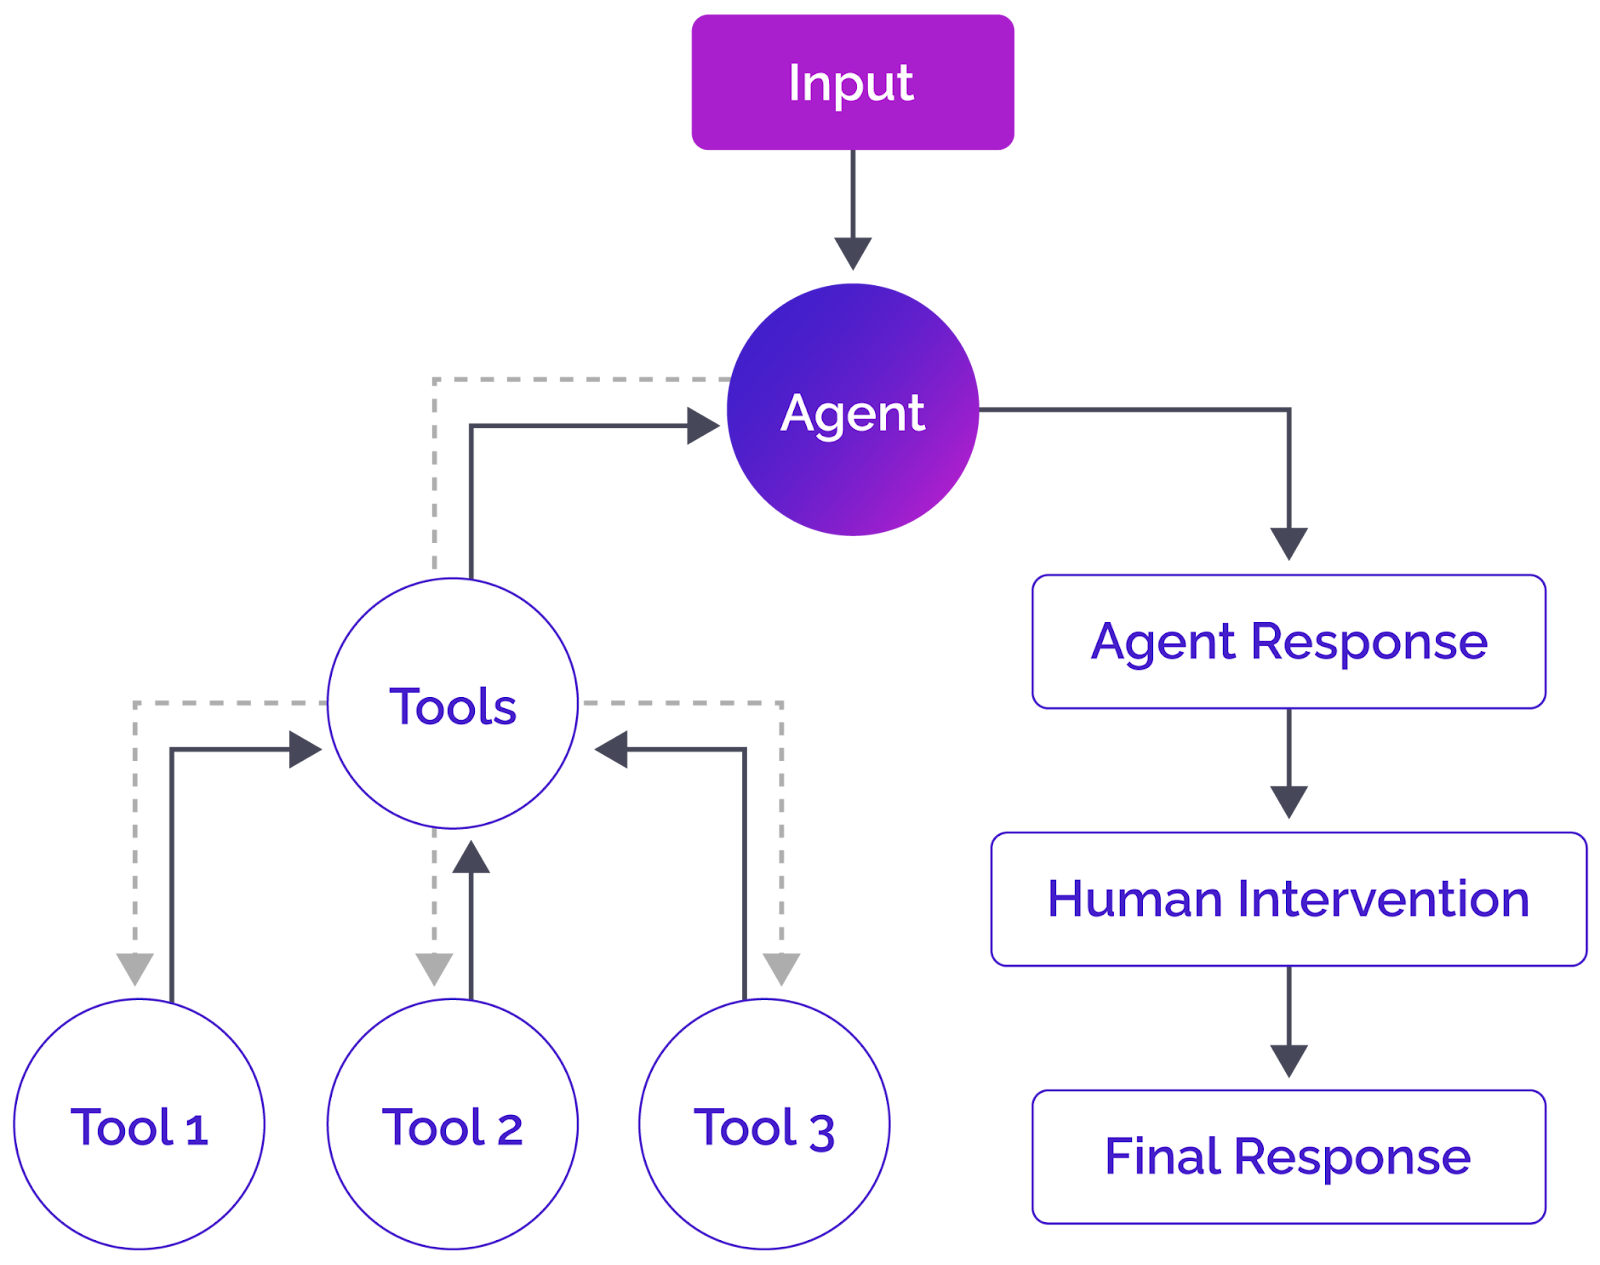
A high-level overview of a LangGraph agent and its components
A LangGraph agent receives input, which can be a user input or input from another LangGraph agent. Typically, an LLM agent processes the input and decides whether it needs to call one or more tools, but it can directly generate a response and proceed to the next stage in the graph.
If the agent decides to call one or more tools, the tool processes the agent output and returns the response to the agent. The agent then generates its response based on the tool output. Once an agent finalizes its response, you can further add an optional "human-in-the-loop" step to refine the agent response before returning the final output.
This is just one example of how LangGraph agents work at a high level. You can create different combinations of nodes and edges to achieve your desired functionality.
Persistence
One key LangGraph feature that distinguishes it from traditional LangChain agents is its built-in persistence mechanism. LangGraph introduces the concept of an agent state shared among all the nodes and edges in a workflow. This allows automatic error recovery, enabling the workflow to resume where it left off.
In addition to the agent state memory, LangGraph supports persisting conversation histories using short-term and long-term memories, which are covered in detail later in the article.
Cycles
LangGraph introduces cycling graphs, allowing agents to communicate with tools in a cyclic manner. For example, an agent may call a tool, retrieve information from the tool, and then call the same or another tool to retrieve follow-up information. Similarly, tools may call each other multiple times to share and refine information before passing it back to an agent. This differentiates it from DAG-based solutions.
Human-in-the-loop capability
LangGraph supports human intervention in agent workflows, which interrupts graph execution at specific points, allowing humans to review, approve, or edit the agent's proposed response. The workflow resumes after receiving human input.
This feature fosters greater control and oversight in critical decision-making processes in an agent's workflow.
LangGraph agents vs. LangChain agents
Before LangGraph, LangChain chains and agents were the go-to techniques for creating agentic LLM applications. The following table briefly compares LangGraph agents with traditional LangChain chains and agents.
| Feature | LangGraph agents | LangChain agents |
|---|---|---|
Structure | Graph-based | Linear or tree-like with custom implementation |
Persistence | Built-in | Manual implementation required |
State management | Automated | Manual implementation required |
Human intervention | Native support | Manual implementation required |
Cycles | Supported | No direct support |
Flexibility | Highly flexible, with loops and branches | Limited compared to LangGraph |
Complexity | Can handle complex workflows | Better for simpler tasks |
To summarize, LangGraph supports implementing more complex agentic workflows while allowing higher flexibility than traditional LangChain chains and agents.
Understanding nodes, edges, and state
If you are new to LangGraph, you must understand a few terms before creating an agent: nodes, edges, and state.

A simple graph in LangGraph showing nodes, edges, and states (source)
Nodes
Nodes are the building blocks of your agents and represent a discrete computation unit within your agent's workflow. A node can be as simple as a small Python function or as complex as an independent agent that calls external tools.
Edges
Edges connect nodes and define how your agent progresses from one step to the next. Edges can be of two types: direct and conditional. A direct edge simply connects two nodes without any condition, whereas a conditional node is similar to an if-else statement and connects two nodes based on a condition.
State
A state is LangGraph's most underrated yet most essential component. It contains all the data and context available to different entities, such as nodes and edges. Simply put, the state shares data and context among all nodes and edges in a graph.
Building a LangGraph agent
Enough with the theory-in this section, you will see all the building blocks of LangGraph agents in action. You will learn how to:
- Create a LangGraph agent from scratch
- Incorporate tools into LangGraph agents
- Stream agent responses
- Use built-in agents
Installing and importing required libraries
This article uses the Python version of LangGraph for examples. To run scripts in this section and the upcoming sections, you need to install the following Python libraries, which allow you to access the various LangGraph functions and tools you will incorporate into your agents.
%pip install langchain-core
%pip install langchain-openai
%pip install -U langgraph
%pip install langchain-community
%pip install --upgrade --quiet  wikipedia
%pip install arxiv
%pip install zep-cloud
Let's import relevant functionalities from the modules above.
[object Object] langchain_openai [object Object] ChatOpenAI
[object Object] langchain_core.messages [object Object] AnyMessage, SystemMessage, HumanMessage, ToolMessage, AIMessage, trim_messages
[object Object] langchain_core.tools [object Object] tool, ToolException, InjectedToolArg
[object Object] langchain_core.runnables [object Object] RunnableConfig
[object Object] langchain_community.utilities [object Object] ArxivAPIWrapper
[object Object] langchain_community.tools [object Object] ArxivQueryRun, HumanInputRun
[object Object] langgraph.graph [object Object] StateGraph,START,END, add_messages, MessagesState
[object Object] langgraph.prebuilt [object Object] create_react_agent, ToolNode
[object Object] langgraph.checkpoint.memory [object Object] MemorySaver
[object Object] langgraph.store.base [object Object] BaseStore
[object Object] langgraph.store.memory [object Object] InMemoryStore
[object Object] typing [object Object] Annotated, [object Object]
[object Object] typing_extensions [object Object] TypedDict
[object Object] pydantic [object Object] BaseModel, Field
[object Object] wikipedia
[object Object] uuid
[object Object] operator
[object Object] IPython.display [object Object] Image, display
[object Object] os
[object Object] google.colab [object Object] userdata
Creating a LangGraph agent from scratch
Let's start with the state definition, which specifies what type of information will flow between different nodes and edges in a graph.
[object Object] [object Object]([object Object]):
  messages: Annotated[[object Object][AnyMessage], operator.add]
This defines a simple state that stores a list of any type of LangChain message, such as ToolMessage, AIMessage, HumanMessage, etc. The operator.add operator will add new messages to the list instead of overwriting existing ones.
Next, we will define a simple Python function to add a node in our LangGraph agent.
[object Object] [object Object]([object Object]):
    messages = state[[object Object]]
    message = model.invoke(messages)
    [object Object] {[object Object]: [message]}
The run_llm() function accepts an object of the State class that we defined before. When we add the run_llm() function to a LangGraph node, LangGraph will automatically pass the agent's state to the run_llm() function.
Let's now create our graph.
graph_builder=StateGraph(State)
graph_builder.add_node([object Object], run_llm)
graph_builder.add_edge(START,[object Object])
graph_builder.add_edge([object Object],END)

graph=graph_builder.[object Object]()
To create a graph, we will create a StateGraph object and define the state type in the StateGraph constructor. Subsequently, we will add a node titled llm and add the run_llm() function to the node.
We add two edges that define the start and end of the agent execution. Our agent has a single node, so we start with the llm node and end the agent execution once we receive the response from the llm node.
Finally, we must compile the graph using the compile() method.
We can visualize the graph using the following script:
display(Image(graph.get_graph().draw_mermaid_png()))
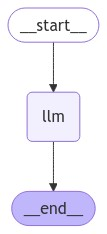
Let's test the agent we just created. To do so, call the invoke() method on the graph object created.
messages = [HumanMessage(content=[object Object])]
result = graph.invoke({[object Object]: messages})
[object Object](result[[object Object]][-[object Object]].content)

In most cases, you will need LangGraph agents to use tools to respond appropriately. The following section explains how to incorporate tools into LangGraph agents.
Incorporating tools into LangGraph agents
An AI tool is a component that enhances the default functionalities of an AI agent, allowing it to perform a specific task or access external information. For example, you can use tools to access the web, connect to an external database, book a flight, etc.
You can incorporate custom and built-in LangChain tools into your LangGraph agents; the approaches remain very similar. In this section, we will see both tool types.
Incorporating a tool into an agent is a highly flexible process. You can directly add a tool to an agent's node or a function to a node that calls one or multiple tools. The latter approach is recommended because it allows for more customization.
Let's first see how to use a built-in LangChain tool in LangGraph. We will use the LangChain ArXiv tool wrapper to create a tool that returns research papers based on user queries.
[object Object] [object Object]([object Object]):
    data = arxiv_tool.invoke(query)
    [object Object] data

[object Object] [object Object]([object Object]):
  topic: [object Object] = Field(description=[object Object])

[object Object]
[object Object] [object Object]([object Object]) -> [object Object]:
  [object Object]
  [object Object] get_arxiv_data(topic)
In the script above, we define the function get_arxiv_data(), which accepts a user query and calls the LangChain ArXiv tool to return research paper information related to a user query.
Next, we inherit the BaseModel class to define the data type our tool will accept as a parameter, which ensures that input to the tool always has a valid input data type.
Finally, we use the @tool decorator and create an arxiv_search tool that calls the get_arxiv_data function. The tool description is critical in this case since the LLM agent selects a tool based on its description.
In the same way, we create a custom tool, as the following script shows:
[object Object] [object Object]([object Object]):
    data = wikipedia.summary(topic)
    [object Object] data

[object Object] [object Object]([object Object]):
  topic: [object Object] = Field(description=[object Object])

[object Object]
[object Object] [object Object]([object Object]) -> [object Object]:
  [object Object]
  [object Object] get_wiki_data(topic)
The tool above uses the Python Wikipedia library to return Wikipedia article summaries based on user queries.
Once you create your tools, the next step is to bind them to the LLM you will use in your agent.
tools = [arxiv_search, wikipedia_search]
tools_names = {t.name: t [object Object] t [object Object] tools}
model = model.bind_tools(tools)
In the next step, we define a function that executes whenever an agent decides to call one or more tools.
[object Object] [object Object]([object Object]):
    tool_calls = state[[object Object]][-[object Object]].tool_calls
    results = []
    [object Object] t [object Object] tool_calls:

      [object Object] [object Object] t[[object Object]] [object Object] tools_names:
        result = [object Object]
      [object Object]:
        result = tools_names[t[[object Object]]].invoke(t[[object Object]])

        results.append(
          ToolMessage(
            tool_call_id=t[[object Object]],
            name=t[[object Object]],
            content=[object Object](result)
          )
        )

    [object Object] {[object Object]: results}
The execute_tools function above will be added to a LangGraph agent's node, automatically receiving the agent's current state. We will only call the execute_tools() function if the agent decides to use one or more tools.
Inside the execute_tools function, we will iteratively call the tools and pass the arguments from the LLM's last response to them. Finally, we will append the tool response to the results[] list and add the list to the model state using the state's messages list.
The last and final step before creating a graph is to define a function that checks whether the agent's latest state contains tool calls.
[object Object] [object Object]([object Object]):
    result = state[[object Object]][-[object Object]]
    [object Object] [object Object](result.tool_calls) > [object Object]
We will use this function to create a conditional edge, which decides whether to go to the execute_tools() function or the END node and returns the agent's final response.
Now let's create a LangGraph agent that uses the tool we created. The following script defines the agent's state and the run_llm() function as before.
[object Object] [object Object]([object Object]):
  messages: Annotated[[object Object][AnyMessage], operator.add]

[object Object] [object Object]([object Object]):
    messages = state[[object Object]]
    message = model.invoke(messages)
    [object Object] {[object Object]: [message]}
The script below defines and displays the complete agent graph.
graph_builder=StateGraph(State)
graph_builder.add_node([object Object], run_llm)
graph_builder.add_node([object Object], execute_tools)
graph_builder.add_conditional_edges(
    [object Object],
     tool_exists,
    {[object Object]: [object Object], [object Object]: END}
    )

graph_builder.add_edge([object Object], [object Object])

graph_builder.set_entry_point([object Object])


graph=graph_builder.[object Object]()

display(Image(graph.get_graph().draw_mermaid_png()))
Here is how the graph looks:
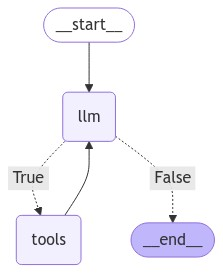
We have two nodes in the graph: the llm, which runs the run_llm() function, and the tools node, which runs the execute_tools() function. The conditional node connects the llm node with the tool or the END node depending upon the output of the llm node. We also add an edge back from the tools to the llm node because we want the llm node to generate the final response with or without the help of the tool.
Now let's test the agent we created. We will first ask the agent to return a research paper.
messages = [HumanMessage(content=[object Object])]
result = graph.invoke({[object Object]: messages})
result

The output above shows that the model has called the arxiv_tool to generate the response. The model is intelligent enough to infer any query about research papers must be routed to the arxiv_search tool.
Let's search for something on Wikipedia.
messages = [HumanMessage(content=[object Object])]
result = graph.invoke({[object Object]: messages})
result

You can see that the model used the wikipedia_search tool to generate the final response.
Streaming agent responses
You can also stream the individual responses from all nodes and edges in your LangGraph agent. Streaming messages allows users to receive responses in real-time. To do so, you can call the stream() function instead of the invoke() method.
Let's define a function that receives streaming agent response and displays it on the console.
[object Object] [object Object]([object Object]):
    [object Object] s [object Object] stream:
        message = s[[object Object]][-[object Object]]
        [object Object] [object Object](message, [object Object]):
            [object Object](message)
        [object Object]:
            message.pretty_print()
Next, call graph().stream() and pass it the input messages. Also set the attribute stream_mode to values, which displays the values of the streaming agent responses.
messages = [HumanMessage(content=[object Object])]
print_stream(graph.stream({[object Object]: messages}, stream_mode= [object Object]))

You will see real-time responses from each graph node printed on the console. For example, in the output above, you can see the human message followed by the AI response, which contains tool calls to the wikipedia_search tool. The tool returns the response to the user query; this is again passed to the AI node, which generates the final response.
Using built-in agents
In previous sections, we created an agent that checks whether it needs a tool's help to generate a final response. If it does, it calls the tool, fetches the tool response, and returns the final response; if it doesn't, it simply returns the default LLM response. We can use LangGraph's built-in ReAct agent to achieve the same functionality.
You can use the react_search_agent() from the langgraph.prebuilt module to create a ReAct agent. To define the ReAct agent's functionality, pass the system_prompt to the state_modifier attribute.
The following script creates a ReAct agent that uses the tool we created in previous sections:
model = ChatOpenAI(model=[object Object])

prompt = [object Object]

react_search_agent = create_react_agent(model, tools, state_modifier= prompt)

display(Image(react_search_agent.get_graph().draw_mermaid_png()))
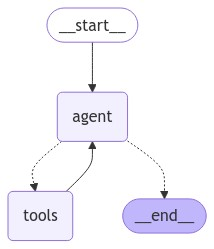
You can see that the ReAct agent above is very similar to what we created earlier from scratch.
Let's test the agent by asking a simple question that doesn't require any tool's help.
messages = [HumanMessage(content=[object Object])]
print_stream(react_search_agent.stream({[object Object]: messages}, stream_mode= [object Object]))

You can see that the ReAct agent generated a response without any tool's assistance.
Let's send another request.
messages = [HumanMessage(content=[object Object])]
print_stream(react_search_agent.stream({[object Object]: messages}, stream_mode= [object Object]))
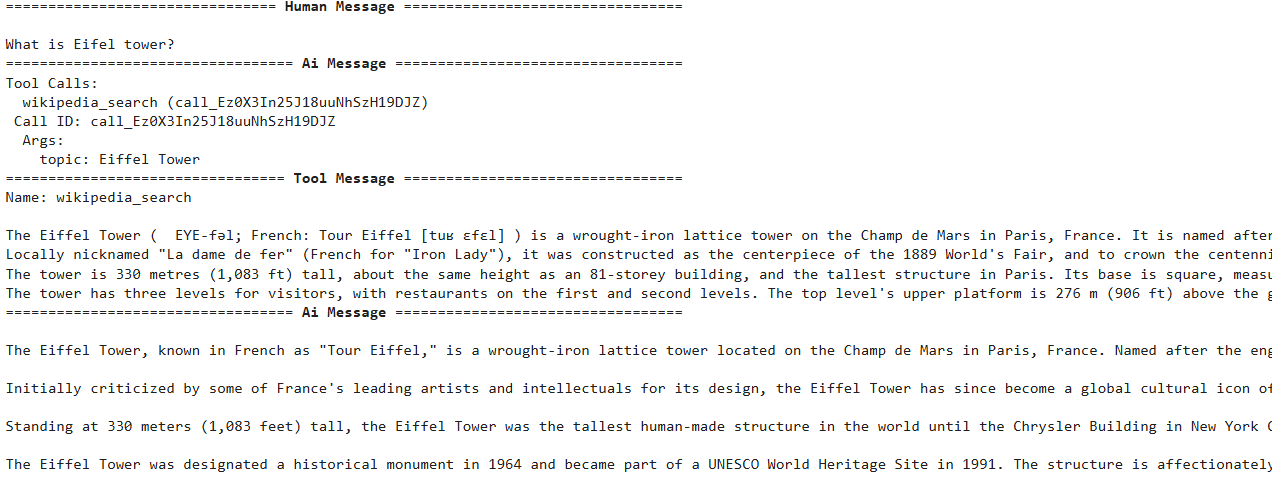
This time, the agent called the wikipedia_search tool before generating the final response.
Memory management in LangGraph
By default, interaction with LangGraph agents is stateless, which means that the agent does not remember the previous conversation and cannot generate responses to follow-up queries. In this section, you will see why you need agents with memory and how to create LangGraph agents that remember previous conversations.
Why do you need agents with memory?
The answer is simple: Humans have memory and can answer follow-up questions. You want your agents to remember what was previously discussed so that they can have a meaningful conversation.
Let's see an example where a user interacts with an agent without conversational memory. We ask the agent: "Who is Christiano Ronaldo?"
messages = [HumanMessage(content=[object Object])]
result = react_search_agent.invoke({[object Object]: messages})
[object Object](result[[object Object]][-[object Object]].content)

Here, the agent probably called the wikipedia_search tool to generate the response. Let's ask a follow-up question about Christiano Ronaldo.
messages = [HumanMessage(content=[object Object])]
result = react_search_agent.invoke({[object Object]: messages})
[object Object](result[[object Object]][-[object Object]].content)

You can see that the model doesn't remember what we asked it previously. Though we could append previous conversations before the current message to provide context to the LLM, an LLM's context window is limited and will eventually be filled, leading to slower agent responses and, in some cases, truncation of conversation context.
Models with very large context windows can store an entire chat history, leading to recall issues where the model may overlook older conversations. Additionally, a large context window might introduce contradictory information if there are conflicting details from earlier parts of the conversation, potentially confusing the model. Lastly, using larger prompts can significantly increase the cost of processing.
The ability of an AI agent to remember previous conversations is crucial in almost all agent types, ranging from medical agents, where an agent must remember a patient's previous information, to e-commerce agents, where it is important for an agent to remember user preferences to provide a customized response.
The diagram below shows an LLM-powered agent's components; tools were used to retrieve additional information in the examples above. In the examples below, the role of memory will be explained.
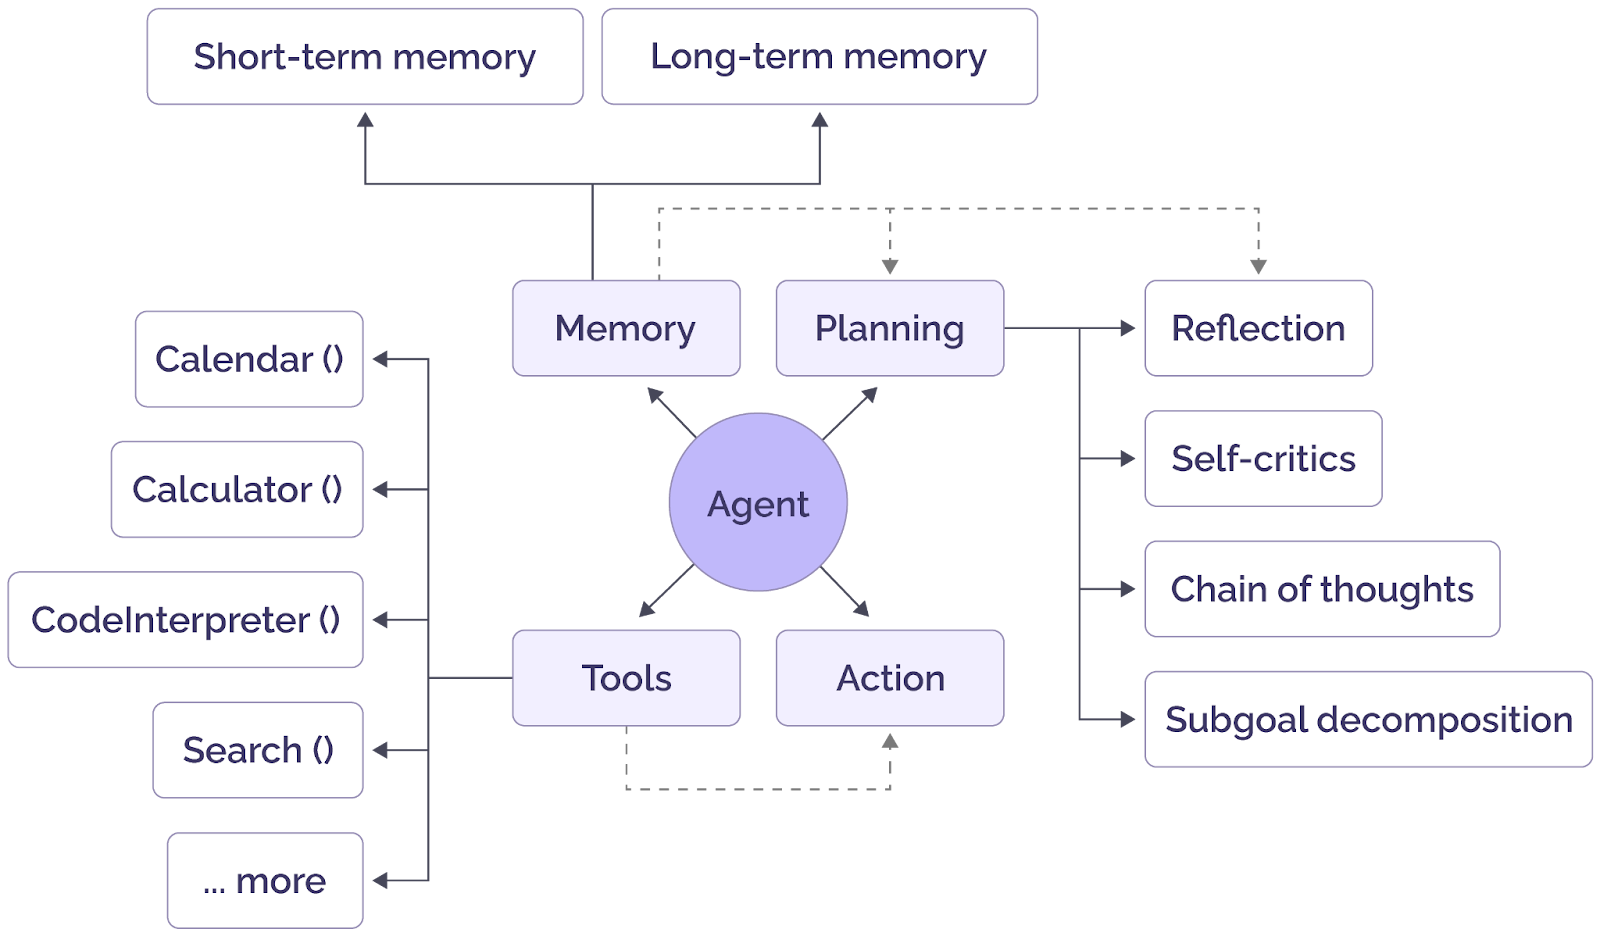
General components of an AI agent (source)
Creating LangGraph agents with memory
LangGraph agents can be created with short-term or long-term memory.
Agents with short-term memory
The easiest way to add persistence to your interactions with LangGraph agents is via checkpointers. To do so, you must pass a memory object (in memory or third-party) to the checkpointer attribute while compiling a LangGraph agent. For example:
graph.compile(checkpointer=memory)
For a ReAct agent, you can pass the memory object to the checkpointer attribute of the create_react_agent() function.
Next, while invoking the graph, you must pass the configurable dictionary containing the value for the thread_id key. The memory is associated with this thread_id.
Here is an example.
memory = MemorySaver()
react_search_agent = create_react_agent(model, tools, state_modifier= prompt,  checkpointer=memory)

config = {[object Object]: {[object Object]: [object Object]}}
messages = [HumanMessage(content=[object Object])]
result = react_search_agent.invoke({[object Object]: messages}, config = config)
[object Object](result[[object Object]][-[object Object]].content)


messages = [HumanMessage(content=[object Object])]
result = react_search_agent.invoke({[object Object]: messages}, config = config)
[object Object](result[[object Object]][-[object Object]].content)
You can see that the agent remembers that we are asking a question about Christiano Ronaldo. However, one drawback of short-term memory is that it is not shared between multiple sessions or threads. For example, if you change the thread_id and ask the same question, the agent will not understand the follow-up query.
config = {[object Object]: {[object Object]: [object Object]}}
messages = [HumanMessage(content=[object Object])]
result = react_search_agent.invoke({[object Object]: messages}, config = config)
[object Object](result[[object Object]][-[object Object]].content)

The other drawback of short-term memory is that the entire chat history might not fit the model context window. Longer chat histories can be complex and often introduce hallucinations in agent responses.
Agents with long-term memory
Recently, LangGraph introduced long-term memory, which you can share across multiple threads. You can also extract facts from user conversations and add them to long-term memory, leading to a shorter and more robust chat context.
You can use LangGraph's InMemoryStore class to manage and store long-term memories. This class stores memories in namespaces, each of which may include multiple memories. Each memory has a memory ID, while context and content are key-value pairs.
The following script shows an example of storing a long-term memory in an InMemoryStore object using the put() method.
[object Object] langgraph.store.memory [object Object] InMemoryStore
memory_store = InMemoryStore()

user_id = [object Object]
namespace = (user_id, [object Object])

memory_id = [object Object]
memory = {[object Object] : [object Object]}
memory_store.put(namespace,
                 memory_id,
                 memory)
You can see memories in a namespace using the following script:
memories = memory_store.search(namespace)
memories[-[object Object]].[object Object]()

Now we will create another memory for the same user:
memory_id = [object Object]
memory = {[object Object] : [object Object]}
memory_store.put(namespace, memory_id, memory)

memories = memory_store.search(namespace)

[object Object] memory [object Object] memories:
    [object Object]([object Object])

You can see two memories in the memory store now. Let's see how you can create a LangGraph agent that uses LangGraph's long-term memory.
We will create a tool that accepts the memory ID, content, and context and inserts them in a memory store. The tool also accepts the configuration dictionary containing the user ID and the memory store object.
[object Object]
[object Object] [object Object]([object Object]):
    [object Object]

    mem_id = memory_id [object Object] uuid.uuid4()
    user_id = config[[object Object]][[object Object]]
    namespace = ([object Object], user_id)
    store.put(
        namespace,
        key=[object Object](mem_id),
        value={[object Object]: content, [object Object]: context},
    )
    [object Object] [object Object]
If the memory ID is not passed, it creates a new memory ID; otherwise, it updates the content of the passed memory ID.
We will define the update_memory function to add to our LangGraph agent node. It will receive the graph's state, the configuration dictionary, and the InMemoryStore object. The function extracts the memory content and context from the graph's state and the user ID from the configuration dictionary.
[object Object] [object Object]([object Object]):

    [object Object]
    recent_tool_calls = state[[object Object]][-[object Object]].tool_calls
    memory_entries = []

    [object Object]
    [object Object] call [object Object] recent_tool_calls:
        memory_content = call[[object Object]][[object Object]]
        memory_context = call[[object Object]][[object Object]]
        memory_entries.append([
            upsert_memory.invoke({[object Object]: memory_content, [object Object]: memory_context, [object Object]: config, [object Object]: store})
        ])
    [object Object]([object Object], memory_entries)

    [object Object]
    response_data = [
        {
            [object Object]: [object Object],
            [object Object]: memory_entry[[object Object]],
            [object Object]: call[[object Object]],
        }
        [object Object] call, memory_entry [object Object] [object Object](recent_tool_calls, memory_entries)
    ]

    [object Object]
    [object Object] {[object Object]: response_data[[object Object]]}
The function passes these values to the upsert_memory tool. The update_memory function adds the tool's response to the state. Next, we define the run_llm() function, which extracts memories from the InMemoryStore object using the user ID and invokes the LLM model using the memories and the user's new query.
[object Object] [object Object]([object Object]):
    user_id = config[[object Object]][[object Object]]
    namespace = ([object Object], user_id)
    memories = store.search(namespace)

    user_info = [object Object].join([object Object] [object Object] mem [object Object] memories)
    [object Object] user_info:
        user_info = [object Object]

    system_msg = [object Object]

    response = model.bind_tools([upsert_memory]).invoke(
        [{[object Object]: [object Object], [object Object]: system_msg}] + state[[object Object]]
    )
    [object Object] {[object Object]: response}
The last step is to define the tool_exists function, which decides whether we need to store user facts in memory.
[object Object] [object Object]([object Object]):
    [object Object]
    msg = state[[object Object]][-[object Object]]
    [object Object] msg.tool_calls:
        [object Object]
        [object Object] [object Object]
    [object Object]
    [object Object] END
Finally, we will create our LangGraph agent that uses long-term memory to respond to user queries:
model = ChatOpenAI(model=[object Object])
memory_store = InMemoryStore()

graph_builder = StateGraph(MessagesState)

graph_builder.add_node([object Object], run_llm)
graph_builder.add_node(update_memory)
graph_builder.add_conditional_edges([object Object], tool_exists, [[object Object], END])
graph_builder.add_edge([object Object], [object Object])

graph_builder.set_entry_point([object Object])
graph = graph_builder.[object Object](store=memory_store)

display(Image(graph.get_graph().draw_mermaid_png()))
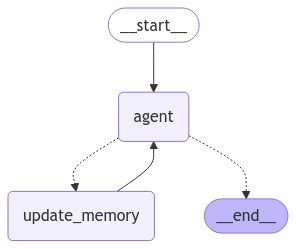
The agent is similar to the ReAct agent we created earlier but maintains a long-term user memory. Let's test the agent.
config = {[object Object]: {[object Object]: [object Object]}}
messages = [HumanMessage(content=[object Object])]
[object Object] chunk [object Object] graph.stream({[object Object]: messages}, config, stream_mode=[object Object]):
  chunk[[object Object]][-[object Object]].pretty_print()
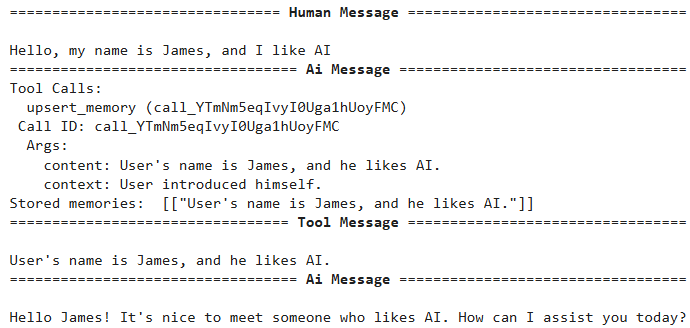
You can see that the agent called the upsert_memory tool and inserted some user information into long-term memory.
config = {[object Object]: {[object Object]: [object Object]}}
messages = [HumanMessage(content=[object Object])]
[object Object] chunk [object Object] graph.stream({[object Object]: messages}, config, stream_mode=[object Object]):
  chunk[[object Object]][-[object Object]].pretty_print()

This shows that the agent remembers the user information. Since there was nothing to add to memory this time, the agent did not call any tool and directly responded to the user.
Problems with LangGraph's default memory options
Though LangGraph provides several default options to store memories, it has certain drawbacks:
- Short-term memories are not shared between multiple sessions and threads.
- The memory context can exceed the LLM model context; in such cases, you must trim or summarize memories to fit the model context.
- Extremely long memory contexts may induce hallucinations in LLM models.
- LangGraph's default long-term memory solves most problems associated with short-term memory. However, even with LangGraph's default long-term memory, generating and updating facts from the conversation history and invalidating existing facts to have the most updated user information is challenging.
This is where Zep's long-term memory comes into play.
Zep Long-Term Memory for Agents
Zep is a memory layer designed for AI agents that addresses several of the limitations of the default LangGraph short-term and long-term memory described above while offering additional functionality.
Zep's memory layer updates as facts change by continually updating a knowledge graph based on user interactions and business data. During conversations with users, new information is collected, and superseded facts are marked as invalid. Developers can retrieve up-to-date facts from the knowledge graph via a single API call, improving response quality by grounding the LLM in relevant historical data. This eliminates the need to store the entire user conversation and extract facts via prompt engineering techniques.
You can install the Zep cloud library via the following pip command:
%pip install zep-cloud
To use Zep cloud, import the Zep class from the zep_cloud.client module and instantiate it by passing the Zep API key. You can create or retrieve an existing API key from the Projects section of your Zep cloud.
[object Object] zep_cloud.client [object Object] Zep
[object Object] zep_cloud [object Object] Message
[object Object] rich

ZEP_API_KEY = userdata.get([object Object])
client = Zep(
    api_key=ZEP_API_KEY,
)
To add memories for a user's thread, you need first to add the user and then the thread. Users have a one-to-many relationship with threads. The Zep client's user.add() method adds a user to Zep cloud, and the thread.create() method creates a new thread. The script below defines a dummy user and the thread to add to Zep cloud.
bot_name = [object Object]

user_name = [object Object]
user_id = user_name + [object Object](uuid.uuid4())[:[object Object]]
thread_id = [object Object](uuid.uuid4())

client.user.add(
    user_id=user_id,
    email=[object Object],
    first_name=user_name,
    last_name=[object Object],
)

client.thread.create(
    user_id=user_id,
    thread_id=thread_id,
)
Let's define a dummy chat history between the user and an agent.
chat_history = [
    {
        [object Object]: [object Object],
        [object Object]: bot_name,
        [object Object]: [object Object],
        [object Object]: [object Object],
    },
    {
        [object Object]: [object Object],
        [object Object]: user_name,
        [object Object]: [object Object],
        [object Object]: [object Object],
    },
    {
        [object Object]: [object Object],
        [object Object]: bot_name,
        [object Object]: [object Object],
        [object Object]: [object Object],
    },
    {
        [object Object]: [object Object],
        [object Object]: user_name,
        [object Object]: [object Object],
        [object Object]: [object Object],
    },
    {
        [object Object]: [object Object],
        [object Object]: bot_name,
        [object Object]: [object Object],
        [object Object]: [object Object],
    },
    {
        [object Object]: [object Object],
        [object Object]: user_name,
        [object Object]: [object Object],
        [object Object]: [object Object],
    },
    {
        [object Object]: [object Object],
        [object Object]: bot_name,
        [object Object]: [object Object],
        [object Object]: [object Object],
    },
]
To populate a Zep thread, you must pass a list of zep_cloud.Message type objects. The following script accepts a list of chat history messages and converts them to a list of zep_cloud.Message type objects. You must pass values for the role, name, and content attributes for each Message object. Finally, you can add messages to a thread using the thread.add_messages() method.
[object Object] [object Object]([object Object]) -> [object Object][Message]:

    [object Object] [
        Message(
            role=msg[[object Object]],
            name=msg.get([object Object], [object Object]),
            content=msg[[object Object]],
        )
        [object Object] msg [object Object] chat_history
    ]

formatted_chat_messages = convert_to_zep_messages(chat_history)

client.thread.add_messages(
    thread_id=thread_id, messages=formatted_chat_messages
)
Once you have messages in a thread, you can retrieve all facts about a user from all threads using the user.get_facts() method, as shown below.
fact_response = client.user.get_facts(user_id=user_id)
[object Object] fact [object Object] fact_response.facts:
    rich.[object Object](fact)
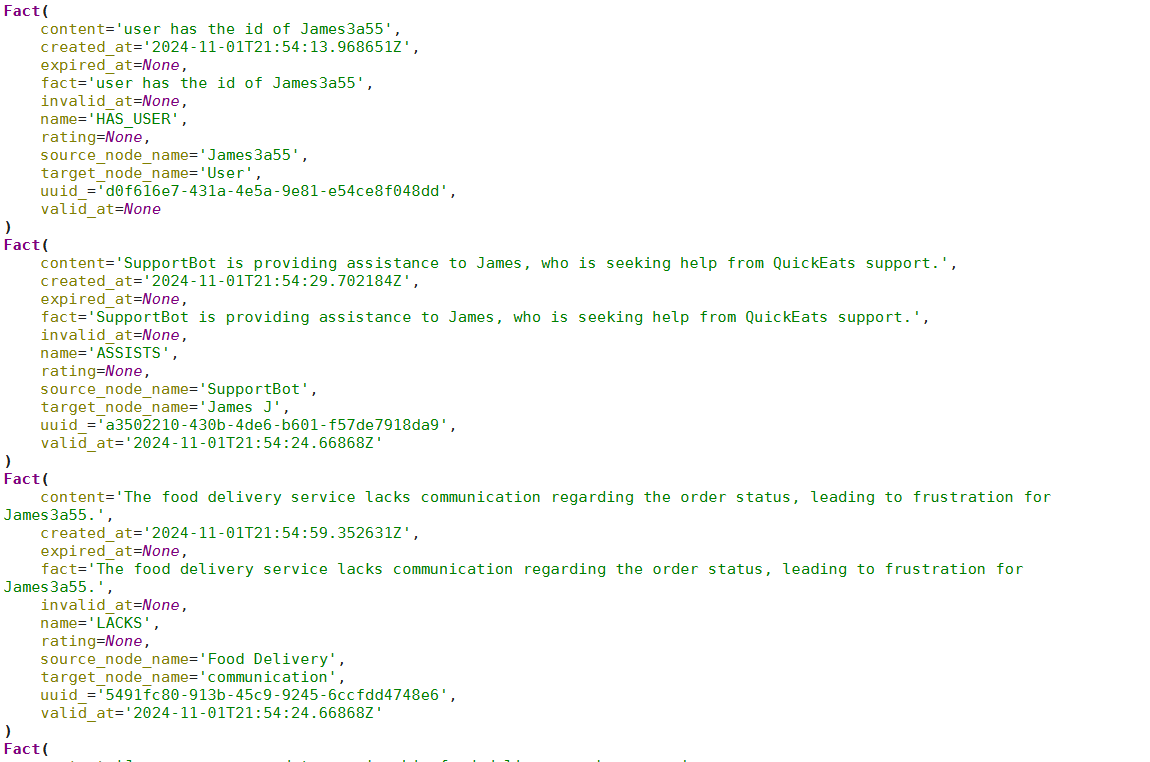
If you are only interested in retrieving context from a specific thread, you can call the thread.get_user_context() method, providing it the thread ID. This returns the relevant context for that thread.
thread_context = client.thread.get_user_context(thread_id=thread_id, mode=[object Object])
rich.[object Object](thread_context)
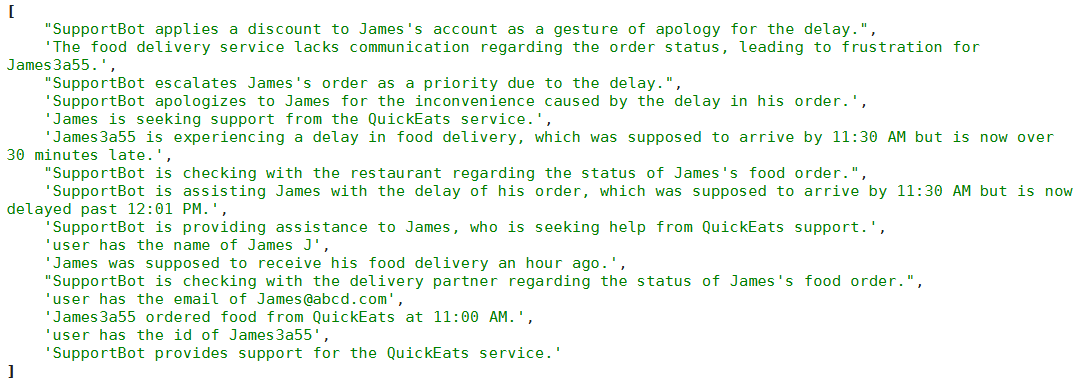
The output above shows the relevant context for a specific user thread.
Putting it all together: a LangGraph agent with Zep
Now that you know how Zep's long-term memory works, let's look at how to develop an agent using LangGraph agents that employ Zep's long-term memory to store user facts. The agent responses will be based on the user facts from Zep's memory.
We will define a graph state that stores messages originating from different nodes, user names, and thread IDs. Next, we will create the search_facts tool, which uses the Zep client's graph.search() method to find user facts relevant to the query.
[object Object] [object Object]([object Object]):
    messages: Annotated[[object Object], add_messages]
    user_name: [object Object]
    thread_id: [object Object]


[object Object]
[object Object] [object Object] [object Object]([object Object]):
    [object Object]
    [object Object] [object Object] client.graph.search(user_id=state[[object Object]], query=query, limit=limit, scope=[object Object])


tools = [search_facts]
tool_node = ToolNode(tools)
model = ChatOpenAI(model=[object Object], temperature=[object Object]).bind_tools(tools)
The search_facts tool is added to the LLM. We also create an object of the ToolNode class, which serves as the method for calling tools.
Subsequently, we define the chatbot() method, which serves as the starting node of the graph. This method fetches relevant user context for the current thread and passes it in the system prompt to the LLM. Note that the system prompt tells the LLM to act as a financial advisor and use the user context to provide a customized response.
[object Object] [object Object]([object Object]):

    context = client.thread.get_user_context(state[[object Object]], mode=[object Object])
    facts_string = [object Object]
    [object Object] context:
        facts_string = context

    system_message = SystemMessage(
        content=[object Object]
    )

    messages = [system_message] + state[[object Object]]

    response = model.invoke(messages)

    [object Object]
    messages_to_save = [
        Message(
            role=[object Object],
            name=state[[object Object]],
            content=state[[object Object]][-[object Object]].content,
        ),
        Message(role=[object Object], content=response.content),
    ]

    client.thread.add_messages(
        thread_id=state[[object Object]],
        messages=messages_to_save,
    )

    [object Object]
    [object Object]
    [object Object]
    state[[object Object]] = trim_messages(
        state[[object Object]],
        strategy=[object Object],
        token_counter=[object Object],
        max_tokens=[object Object],
        start_on=[object Object],
        end_on=([object Object], [object Object]),
        include_system=[object Object],
    )

    [object Object] {[object Object]: [response]}
The LLM response is added to the Zep thread using the thread.add_messages() method. Zep will automatically extract facts from these messages and update the knowledge graph. Notice that, unlike traditional memory management, you don't have to do any prompt engineering to extract and save facts while using Zep—everything is done behind the scenes for you.
Finally, we trim the messages in the message state to the last three since we don't need the complete message history. We use Zep user facts to maintain context in the conversation.
We will define a method called should_continue that we will add to the conditional edge to decide whether the LLM should call the search_facts tool or directly send a response to the user.
Finally, we define our LangGraph and print the graph's figure.
graph_builder = StateGraph(State)

memory = MemorySaver()

[object Object] [object Object]([object Object]):
    messages = state[[object Object]]
    last_message = messages[-[object Object]]
    [object Object]
    [object Object] [object Object] last_message.tool_calls:
        [object Object] [object Object]
    [object Object]
    [object Object]:
        [object Object] [object Object]

graph_builder.add_node([object Object], chatbot)
graph_builder.add_node([object Object], tool_node)

graph_builder.add_edge(START, [object Object])

graph_builder.add_conditional_edges([object Object], should_continue, {[object Object]: [object Object], [object Object]: END})
graph_builder.add_edge([object Object], [object Object])


graph = graph_builder.[object Object](checkpointer=memory)
display(Image(graph.get_graph().draw_mermaid_png()))
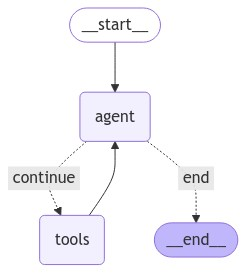
The graph above is similar to the ReAct agent, where the tools node now calls the search_facts tool. Next, we will define the extract_messages() function that extracts messages from the response returned by the graph.invoke() method.
[object Object] [object Object]([object Object]):
    output = [object Object]
    [object Object] message [object Object] result[[object Object]]:
        [object Object] [object Object](message, AIMessage):
            role = [object Object]
        [object Object]:
            role = result[[object Object]]
        output += [object Object]
    [object Object] output.strip()
Finally, we define the graph_invoke() function, which accepts user query, user name, and session name (thread_id in the following script) and returns the LangGraph agent's response.
[object Object] [object Object]([object Object]):
    r = graph.invoke(
        {
            [object Object]: [
                {
                    [object Object]: [object Object],
                    [object Object]: message,
                }
            ],
            [object Object]: user_name,
            [object Object]: thread_id,
        },
        config={[object Object]: {[object Object]: thread_id}},
    )

    [object Object] ai_response_only:
        [object Object] r[[object Object]][-[object Object]].content
    [object Object]:
        [object Object] extract_messages(r)
To test the agent, we will create a new thread for a dummy user and add the user and the thread to Zep cloud.
user_name = [object Object] + uuid.uuid4().[object Object][:[object Object]]
thread_id = uuid.uuid4().[object Object]

client.user.add(user_id=user_name)
client.thread.create(thread_id=thread_id,
                     user_id=user_name)
Next, we will execute a while loop that accepts user inputs; calls the graph_invoke() method using the user name, thread ID, and user input; and prints the agent's response on the console.
[object Object] [object Object]:

    user_input = [object Object]([object Object])

    [object Object] user_input.lower() == [object Object]:
        [object Object]([object Object])
        [object Object]

    [object Object]
    r = graph_invoke(
        user_input,   [object Object]
        user_name,    [object Object]
        thread_id,    [object Object]
    )

    [object Object]
    [object Object]([object Object], r)
Let's test the agent by providing it with some information.

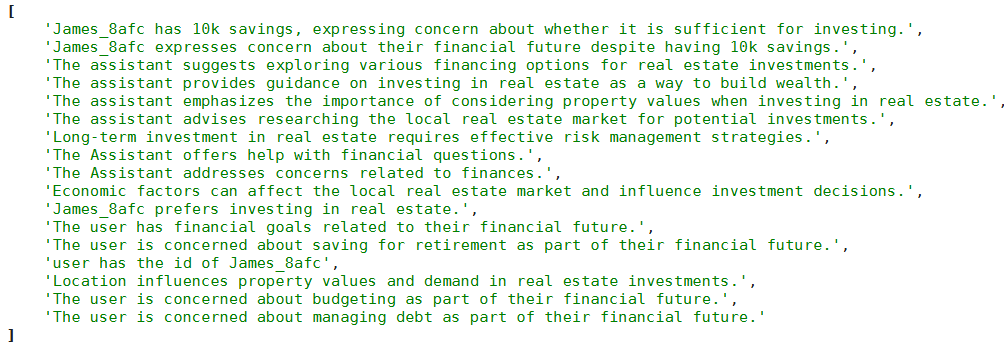
You can check the thread to see the context the agent has stored about the user.
thread_context = client.thread.get_user_context(thread_id=thread_id, mode=[object Object])
rich.[object Object](thread_context)
Let's ask a question to verify that the agent can access the user facts.

You can see that the agent has all the information about the user. Zep memory stores important facts about the user, which you can use to avoid hallucinations and improve the personalized customer experience.
Guidelines for building LangGraph agents
Here are some of the guidelines you should follow while working with LangChain agents:
- Remember that LangGraph was built by the creators of LangChain but can be used without LangChain. It is a more powerful framework for building AI Agents because LangGraph allows you to define flows that involve cycles, which is essential for most agentic architectures.
- Tools are integral to LangGraph agents, but they should not be overused. Only implement tools to fetch information that an LLM agent does not possess by default.
- The tool description should include as much detail as possible. This will help the agent select the correct tool for the task.
- An agent is only as good as its context. Depending on your requirements, store all the relevant information from past conversations in short- or long-term memory.
- Third-party SDKs (like Zep) can make your life easier by automatically managing memory and storing conversation facts, permitting a personalized user experience.
Last thoughts
LangGraph agents provide a flexible way to develop complex LLM applications. This article explains LangGraph agents and how to implement them with detailed examples. Adding external tools enables the agents to retrieve external information, and persisting memory across conversations enables the LangGraph agent to provide contextualized responses.
Zep's long-term memory stores conversation context and user facts. Zep is fast and highly effective in extracting relevant user facts, resulting in better and more personalized user responses. Incorporating Zep's long-term memory helped the agent remember user facts, allowing it to provide personalized responses.